ShopDreamUp AI ArtDreamUp

Deviation Actions


![Meredith And Sammy Meet Sandy Cheeks [Sketch]](https://images-wixmp-ed30a86b8c4ca887773594c2.wixmp.com/f/4a99568e-3ad8-44ba-811b-33df7dffe697/des7p52-b8a0cf0d-e94b-4a85-b1b4-8aa6b823e823.jpg/v1/crop/w_184,h_184,x_6,y_0,scl_0.25449515905947,q_70,strp/meredith_and_sammy_meet_sandy_cheeks__sketch__by_scampthewolf_des7p52-92s-2x.jpg?token=eyJ0eXAiOiJKV1QiLCJhbGciOiJIUzI1NiJ9.eyJzdWIiOiJ1cm46YXBwOjdlMGQxODg5ODIyNjQzNzNhNWYwZDQxNWVhMGQyNmUwIiwiaXNzIjoidXJuOmFwcDo3ZTBkMTg4OTgyMjY0MzczYTVmMGQ0MTVlYTBkMjZlMCIsIm9iaiI6W1t7ImhlaWdodCI6Ijw9NzIzIiwicGF0aCI6IlwvZlwvNGE5OTU2OGUtM2FkOC00NGJhLTgxMWItMzNkZjdkZmZlNjk3XC9kZXM3cDUyLWI4YTBjZjBkLWU5NGItNGE4NS1iMWI0LThhYTZiODIzZTgyMy5qcGciLCJ3aWR0aCI6Ijw9ODE4In1dXSwiYXVkIjpbInVybjpzZXJ2aWNlOmltYWdlLm9wZXJhdGlvbnMiXX0.Yqk33EifMB7PFyNAnLgfFVwj_u2kiMyfizszKCuhRW8)
![Meredith And Sammy Meet Sandy Cheeks [Sketch]](https://images-wixmp-ed30a86b8c4ca887773594c2.wixmp.com/f/4a99568e-3ad8-44ba-811b-33df7dffe697/des7p52-b8a0cf0d-e94b-4a85-b1b4-8aa6b823e823.jpg/v1/crop/w_92,h_92,x_3,y_0,scl_0.12724757952974,q_70,strp/meredith_and_sammy_meet_sandy_cheeks__sketch__by_scampthewolf_des7p52-92s.jpg?token=eyJ0eXAiOiJKV1QiLCJhbGciOiJIUzI1NiJ9.eyJzdWIiOiJ1cm46YXBwOjdlMGQxODg5ODIyNjQzNzNhNWYwZDQxNWVhMGQyNmUwIiwiaXNzIjoidXJuOmFwcDo3ZTBkMTg4OTgyMjY0MzczYTVmMGQ0MTVlYTBkMjZlMCIsIm9iaiI6W1t7ImhlaWdodCI6Ijw9NzIzIiwicGF0aCI6IlwvZlwvNGE5OTU2OGUtM2FkOC00NGJhLTgxMWItMzNkZjdkZmZlNjk3XC9kZXM3cDUyLWI4YTBjZjBkLWU5NGItNGE4NS1iMWI0LThhYTZiODIzZTgyMy5qcGciLCJ3aWR0aCI6Ijw9ODE4In1dXSwiYXVkIjpbInVybjpzZXJ2aWNlOmltYWdlLm9wZXJhdGlvbnMiXX0.Yqk33EifMB7PFyNAnLgfFVwj_u2kiMyfizszKCuhRW8)
![Quazzy And Chipper Reborn [Sketch]](https://images-wixmp-ed30a86b8c4ca887773594c2.wixmp.com/f/4a99568e-3ad8-44ba-811b-33df7dffe697/deo4cji-f0af0571-cb3f-434f-a679-6b3c2be3ca72.jpg/v1/crop/w_184,h_184,x_0,y_1,scl_0.23650385604113,q_70,strp/quazzy_and_chipper_reborn__sketch__by_scampthewolf_deo4cji-92s-2x.jpg?token=eyJ0eXAiOiJKV1QiLCJhbGciOiJIUzI1NiJ9.eyJzdWIiOiJ1cm46YXBwOjdlMGQxODg5ODIyNjQzNzNhNWYwZDQxNWVhMGQyNmUwIiwiaXNzIjoidXJuOmFwcDo3ZTBkMTg4OTgyMjY0MzczYTVmMGQ0MTVlYTBkMjZlMCIsIm9iaiI6W1t7ImhlaWdodCI6Ijw9Nzk1IiwicGF0aCI6IlwvZlwvNGE5OTU2OGUtM2FkOC00NGJhLTgxMWItMzNkZjdkZmZlNjk3XC9kZW80Y2ppLWYwYWYwNTcxLWNiM2YtNDM0Zi1hNjc5LTZiM2MyYmUzY2E3Mi5qcGciLCJ3aWR0aCI6Ijw9Nzc4In1dXSwiYXVkIjpbInVybjpzZXJ2aWNlOmltYWdlLm9wZXJhdGlvbnMiXX0.1YS7ZqWJZn5jijPh6BW5srbnPVlgul_0gTMJbSNv3qE)
![Quazzy And Chipper Reborn [Sketch]](https://images-wixmp-ed30a86b8c4ca887773594c2.wixmp.com/f/4a99568e-3ad8-44ba-811b-33df7dffe697/deo4cji-f0af0571-cb3f-434f-a679-6b3c2be3ca72.jpg/v1/crop/w_92,h_92,x_0,y_1,scl_0.11825192802057,q_70,strp/quazzy_and_chipper_reborn__sketch__by_scampthewolf_deo4cji-92s.jpg?token=eyJ0eXAiOiJKV1QiLCJhbGciOiJIUzI1NiJ9.eyJzdWIiOiJ1cm46YXBwOjdlMGQxODg5ODIyNjQzNzNhNWYwZDQxNWVhMGQyNmUwIiwiaXNzIjoidXJuOmFwcDo3ZTBkMTg4OTgyMjY0MzczYTVmMGQ0MTVlYTBkMjZlMCIsIm9iaiI6W1t7ImhlaWdodCI6Ijw9Nzk1IiwicGF0aCI6IlwvZlwvNGE5OTU2OGUtM2FkOC00NGJhLTgxMWItMzNkZjdkZmZlNjk3XC9kZW80Y2ppLWYwYWYwNTcxLWNiM2YtNDM0Zi1hNjc5LTZiM2MyYmUzY2E3Mi5qcGciLCJ3aWR0aCI6Ijw9Nzc4In1dXSwiYXVkIjpbInVybjpzZXJ2aWNlOmltYWdlLm9wZXJhdGlvbnMiXX0.1YS7ZqWJZn5jijPh6BW5srbnPVlgul_0gTMJbSNv3qE)
![The Pool Ball Incident Part 8 [Sketch]](https://images-wixmp-ed30a86b8c4ca887773594c2.wixmp.com/f/4a99568e-3ad8-44ba-811b-33df7dffe697/dep705k-f0209784-0691-4eda-8fe0-0c713bd0f5c0.jpg/v1/crop/w_184,h_184,x_0,y_9,scl_0.24210526315789,q_70,strp/the_pool_ball_incident_part_8__sketch__by_scampthewolf_dep705k-92s-2x.jpg?token=eyJ0eXAiOiJKV1QiLCJhbGciOiJIUzI1NiJ9.eyJzdWIiOiJ1cm46YXBwOjdlMGQxODg5ODIyNjQzNzNhNWYwZDQxNWVhMGQyNmUwIiwiaXNzIjoidXJuOmFwcDo3ZTBkMTg4OTgyMjY0MzczYTVmMGQ0MTVlYTBkMjZlMCIsIm9iaiI6W1t7ImhlaWdodCI6Ijw9OTA1IiwicGF0aCI6IlwvZlwvNGE5OTU2OGUtM2FkOC00NGJhLTgxMWItMzNkZjdkZmZlNjk3XC9kZXA3MDVrLWYwMjA5Nzg0LTA2OTEtNGVkYS04ZmUwLTBjNzEzYmQwZjVjMC5qcGciLCJ3aWR0aCI6Ijw9NzYwIn1dXSwiYXVkIjpbInVybjpzZXJ2aWNlOmltYWdlLm9wZXJhdGlvbnMiXX0.JxGDnNRlpvg7Ud4pSApfwbOn7an8Ft9viyBwCfNscR0)
![The Pool Ball Incident Part 8 [Sketch]](https://images-wixmp-ed30a86b8c4ca887773594c2.wixmp.com/f/4a99568e-3ad8-44ba-811b-33df7dffe697/dep705k-f0209784-0691-4eda-8fe0-0c713bd0f5c0.jpg/v1/crop/w_92,h_92,x_0,y_4,scl_0.12105263157895,q_70,strp/the_pool_ball_incident_part_8__sketch__by_scampthewolf_dep705k-92s.jpg?token=eyJ0eXAiOiJKV1QiLCJhbGciOiJIUzI1NiJ9.eyJzdWIiOiJ1cm46YXBwOjdlMGQxODg5ODIyNjQzNzNhNWYwZDQxNWVhMGQyNmUwIiwiaXNzIjoidXJuOmFwcDo3ZTBkMTg4OTgyMjY0MzczYTVmMGQ0MTVlYTBkMjZlMCIsIm9iaiI6W1t7ImhlaWdodCI6Ijw9OTA1IiwicGF0aCI6IlwvZlwvNGE5OTU2OGUtM2FkOC00NGJhLTgxMWItMzNkZjdkZmZlNjk3XC9kZXA3MDVrLWYwMjA5Nzg0LTA2OTEtNGVkYS04ZmUwLTBjNzEzYmQwZjVjMC5qcGciLCJ3aWR0aCI6Ijw9NzYwIn1dXSwiYXVkIjpbInVybjpzZXJ2aWNlOmltYWdlLm9wZXJhdGlvbnMiXX0.JxGDnNRlpvg7Ud4pSApfwbOn7an8Ft9viyBwCfNscR0)


![Pounce! [AT with AdorableDestiny!]](https://images-wixmp-ed30a86b8c4ca887773594c2.wixmp.com/f/869fdd5e-5b85-4dba-bf4e-7aab95f98641/dgsbtu4-4fc02d52-5987-4b2c-aadc-05a11213ca16.jpg/v1/crop/w_184,h_184,x_0,y_0,scl_0.18381618381618,q_70,strp/pounce___at_with_adorabledestiny___by_heartsurf_dgsbtu4-92s-2x.jpg?token=eyJ0eXAiOiJKV1QiLCJhbGciOiJIUzI1NiJ9.eyJzdWIiOiJ1cm46YXBwOjdlMGQxODg5ODIyNjQzNzNhNWYwZDQxNWVhMGQyNmUwIiwiaXNzIjoidXJuOmFwcDo3ZTBkMTg4OTgyMjY0MzczYTVmMGQ0MTVlYTBkMjZlMCIsIm9iaiI6W1t7ImhlaWdodCI6Ijw9MTAwMSIsInBhdGgiOiJcL2ZcLzg2OWZkZDVlLTViODUtNGRiYS1iZjRlLTdhYWI5NWY5ODY0MVwvZGdzYnR1NC00ZmMwMmQ1Mi01OTg3LTRiMmMtYWFkYy0wNWExMTIxM2NhMTYuanBnIiwid2lkdGgiOiI8PTEwMDEifV1dLCJhdWQiOlsidXJuOnNlcnZpY2U6aW1hZ2Uub3BlcmF0aW9ucyJdfQ.CD-zSC-zKDVDNBtRZyPu0acnjJFeMw6YJA5nklF1bgs)
![Pounce! [AT with AdorableDestiny!]](https://images-wixmp-ed30a86b8c4ca887773594c2.wixmp.com/f/869fdd5e-5b85-4dba-bf4e-7aab95f98641/dgsbtu4-4fc02d52-5987-4b2c-aadc-05a11213ca16.jpg/v1/crop/w_92,h_92,x_0,y_0,scl_0.091908091908092,q_70,strp/pounce___at_with_adorabledestiny___by_heartsurf_dgsbtu4-92s.jpg?token=eyJ0eXAiOiJKV1QiLCJhbGciOiJIUzI1NiJ9.eyJzdWIiOiJ1cm46YXBwOjdlMGQxODg5ODIyNjQzNzNhNWYwZDQxNWVhMGQyNmUwIiwiaXNzIjoidXJuOmFwcDo3ZTBkMTg4OTgyMjY0MzczYTVmMGQ0MTVlYTBkMjZlMCIsIm9iaiI6W1t7ImhlaWdodCI6Ijw9MTAwMSIsInBhdGgiOiJcL2ZcLzg2OWZkZDVlLTViODUtNGRiYS1iZjRlLTdhYWI5NWY5ODY0MVwvZGdzYnR1NC00ZmMwMmQ1Mi01OTg3LTRiMmMtYWFkYy0wNWExMTIxM2NhMTYuanBnIiwid2lkdGgiOiI8PTEwMDEifV1dLCJhdWQiOlsidXJuOnNlcnZpY2U6aW1hZ2Uub3BlcmF0aW9ucyJdfQ.CD-zSC-zKDVDNBtRZyPu0acnjJFeMw6YJA5nklF1bgs)


Description
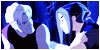
Finished version of my small session on "how I make a pic".
This is the last one, and just shall show how a finished version COULD look like.
I have chosen an easy background here.
In the last Step I was going to shade each part of the characters.
When that is done comes the next step.
Step 13. is about to have one single layer again with a white background and shaded characters.
You make a second layer and fill it with black.
Step 14. is, going back on the layer with your characters and cut out the white parts in it all arround the characters, till they are free from all the white and you only see the black layer below them.
Step 15. you go on the lower black layer and use a brush which looks like a cloud and set it in the transparent modus of 25%. To make a fire optic, use dark red first and use it on the upper part of the picture only!
Then you chose a clear red and brush slightly over the lower part where the dark red begins. You go from black into dark red, just like the flame would go from below to up into the sky.
Then you use orange, where you just go into the bright red, but watch you don´t go with the color everywhere, so you still have red where it shall be, and not orange all over your place.
Then you use yellow and then white. Because of the brush is transparent, you get a good glowing and flow with the colors which form the flames.
Step 16. your flames are finished. Now you can make a shadow for your characters, like I did.
For that you copy the character layer. Now you have two of them. Chose the upper one and make them all black.
Step 17. you transform their shape to any direction and them them a little bit infront of the other "original character layer's" feet. Set the black layer below the character layer.
Step 18. is easy. Just make the lower layer with the black reshaped shadows transparent to 70%.
Step 19. use an eraser and give it a big and smooth shape. Set it on erasing just on a 30% modus and start to erase the upper part of the shadow layer which now is in the middle of all layers.
Move down with the eraser so you see that the shadow at the feet still is strong visible and the more it reaches up it gets more and more invisible.
Step 20. Put all layers together.
Now you can put names, your signature or whatever onto the pic with a pen tool or a brush tool.
Your picture is finished now!
For those who don´t know, these are two Akrennians.
The one on the left ist my OC and "fursona" Sal and the other one is Preed from Titan AE.
I had the idea to set both of them on one pic to show the differences in color, markings and ofcause size!
Preed is a typical "plane land akrennian" who become semi-huge. For an akrennian he is not tall, but not small either.
He measures 2,10m how it says on the trading card.
Sal is a desert land akrennian who are much smaller. Because of living in the permanent sun, they are smaller to not get heat-attack so fast and dry out. The brigh colors are very common for desert land akrennians, so are the grey shaded colors to plane land akrennians.
Sal is a little bit chubby. He is not fat or anything, but has a belly, and he only measures 1,80m. For a desert akrennian absolutely medium sized and normal.
Here you can learn more about their color types and markings.
Image size
2307x3865px 404.32 KB
© 2013 - 2024 MrWolf86
Comments0
Join the community to add your comment. Already a deviant? Log In